Nginx with TLS on OpenWRT
In the article “Install OpenWRT on your Raspberry PI”, I explained how to install OpenWRT on a Raspberry PI and the first steps as an OpenWRT user. As I plan to use my Raspberry PI to host plenty of web applications, I wanted to setup a versatile reverse proxy to protect them all, along with TLS support to meet nowadays security requirements.
OpenWRT has an nginx package, ready to be installed using opkg but unfortunately it does not have TLS enabled. So we need to recompile nginx with TLS enabled!
Install the OpenWRT SDK
Install a Linux distribution supported by the OpenWRT build system in a Virtual Machine (the OpenWRT SDK has the same requirements as the OpenWRT build system). For instance, Ubuntu Server LTS 18.04.3.
Install the build system pre-requisites.
sudo apt-get install -y build-essential libncurses5-dev gawk git libssl-dev gettext unzip zlib1g-dev file python-dev libmodule-build-perl libmodule-install-perl libthread-queue-any-perl
Then, download the OpenWRT SDK matching your target platform. To do so, you will need to know the target and subtarget. For Raspberry PI devices, the target is brcm2708 and the subtarget depends on your Raspberry PI model. For my Raspberry PI 3B+, the subtarget is bcm2710. If you have a different model, check the OpenWRT documentation.
Now, go to the download page for the brcm2708 target and click on your subtarget (bcm2710 in my case).
In the Supplementary Files section, download openwrt-sdk-*.tar.xz and expand the archive.
curl -o openwrt-sdk.tar.xz https://downloads.openwrt.org/releases/18.06.2/targets/brcm2708/bcm2710/openwrt-sdk-18.06.2-brcm2708-bcm2710_gcc-7.3.0_musl.Linux-x86_64.tar.xz
tar Jxvf openwrt-sdk.tar.xz
mv openwrt-sdk-*/ openwrt-sdk
cd openwrt-sdk
Generate a key pair to sign the packages.
staging_dir/host/bin/usign -G -p key-build.pub -s key-build
Fetch the existing package feed.
scripts/feeds update -a
Compile nginx with TLS
Rename the nginx feed to nginx-tls so that our rebuilt package does not mix with the existing OpenWRT packages.
mv feeds/packages/net/nginx feeds/packages/net/nginx-tls
You also have to change the package name in a few files.
sed -i.bak -r 's/^PKG_NAME:=.*/PKG_NAME:=nginx-tls/; s/call BuildPackage,nginx(-tls)?/call BuildPackage,nginx-tls/; s/^(define Package\/nginx)(-tls)?/\1-tls/' feeds/packages/net/nginx-tls/Makefile
sed -i.bak -r 's/PACKAGE_nginx(-tls)?/PACKAGE_nginx-tls/' feeds/packages/net/nginx-tls/Config.in
Regenerate the index file and install the nginx-tls feed.
scripts/feeds update -i
scripts/feeds install nginx-tls
Run make menuconfig to configure the SDK.
make menuconfig
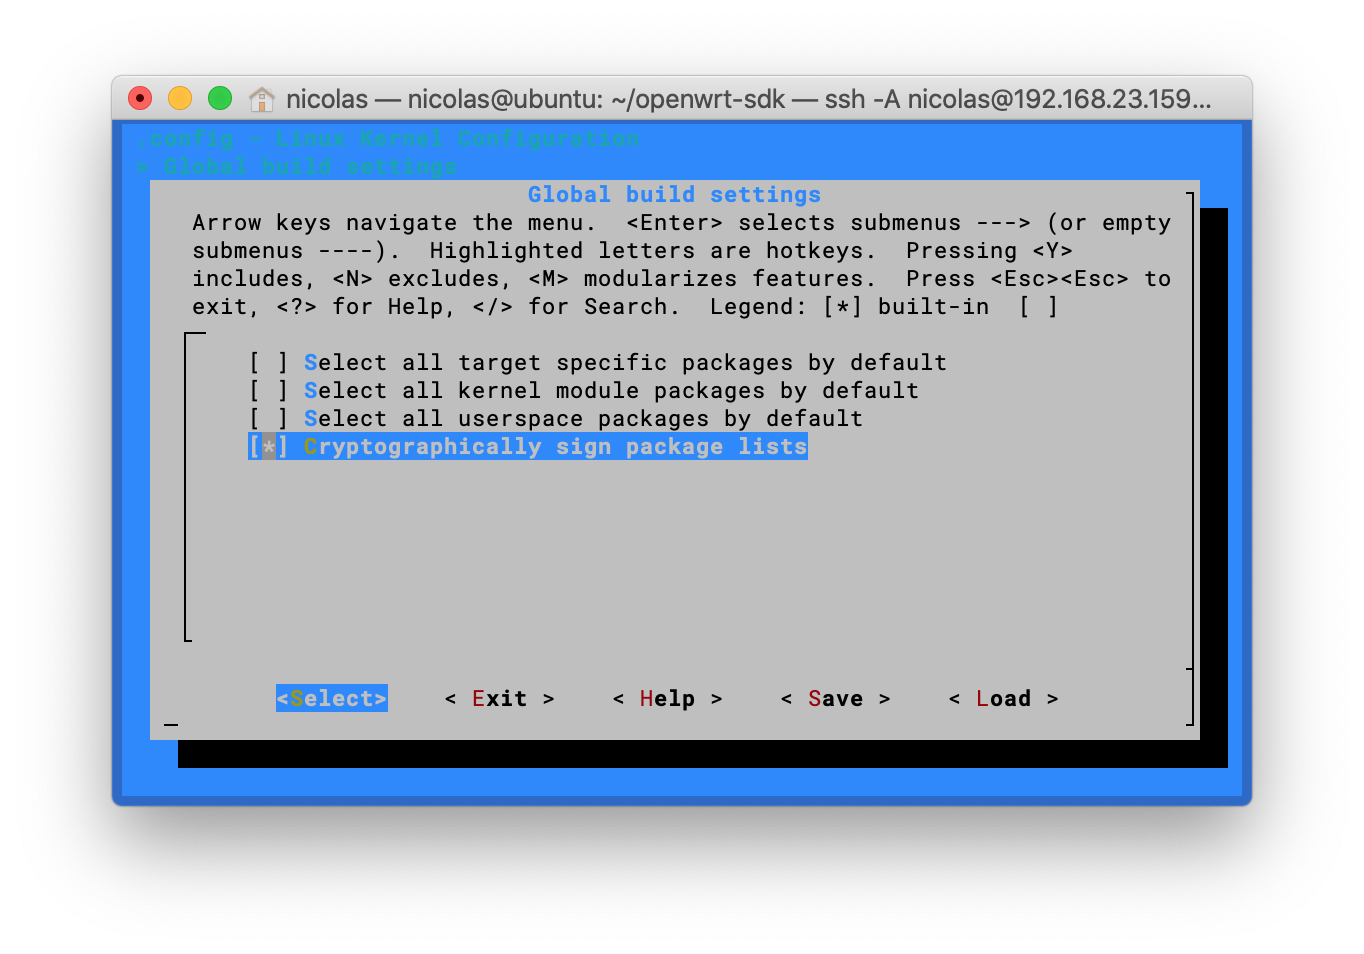
Enter Global Build Settings and:
- Press space to unset Select all target specific packages by default
- Press space to unset Select all kernel module packages by default
- Press space to unset Select all userspace packages by default
- Leave Cryptographically sign packages set
Go back to the root menu.
Drill down to Network > Web Servers/Proxies and:
- Press space to select nginx
- Press enter to enter configuration
- Choose Configuration
- Press space to select “Enable SSL Module”
- Exit five times and save
Build the nginx package.
make package/feeds/packages/nginx-tls/download
make package/feeds/packages/nginx-tls/prepare
make package/feeds/packages/nginx-tls/compile
Create the Packages.gz index (this will make the output directory usable as a local opkg source).
make package/index
Once the build finished, the built packages will be in bin/packages.
$ ls bin/packages/*/*/*.ipk
bin/packages/aarch64_cortex-a53/base/libopenssl_1.0.2q-1_aarch64_cortex-a53.ipk
bin/packages/aarch64_cortex-a53/base/zlib_1.2.11-2_aarch64_cortex-a53.ipk
bin/packages/aarch64_cortex-a53/packages/libpcre_8.41-2_aarch64_cortex-a53.ipk
bin/packages/aarch64_cortex-a53/packages/nginx-tls_1.12.2-1_aarch64_cortex-a53.ipk
Create a local opkg repository
Create a directory on your Raspberry PI that will be used as an opkg repository.
mkdir -p /opt/opkg/
Declare the local opkg repository in customfeeds.conf.
cat > /etc/opkg/customfeeds.conf <<"EOF"
src/gz base file:/opt/opkg/base
src/gz packages file:/opt/opkg/packages
EOF
Copy the freshly compiled nginx package on your OpenWRT system.
scp -r bin/packages/*/base/ bin/packages/*/packages/ root@raspberry-pi.example.test:/opt/opkg/
Copy the public key that signed the packages on your OpenWRT system.
scp key-build.pub root@raspberry-pi.example.test:/etc/opkg/keys/$(staging_dir/host/bin/usign -F -p key-build.pub)
Install nginx
Install nginx-tls on your device.
opkg update
opkg install nginx-tls libopenssl zlib
Note: if like me you have issues with the packages signature being rejected, you can disable temporarily the signature validation in /opt/opkg.conf by commenting out option check_signature.
# cat /etc/opkg.conf
dest root /
dest ram /tmp
lists_dir ext /var/opkg-lists
option overlay_root /overlay
# option check_signature
Install Lego
Lego is a client for the Let’s Encrypt CA. It will help us get valid TLS certificates for our nginx instance.
Install lego from the binaries.
mkdir -p /opt/lego/bin
wget -O /tmp/lego.tgz https://github.com/go-acme/lego/releases/download/v3.2.0/lego_v3.2.0_linux_arm64.tar.gz
tar -C /opt/lego/bin -zxvf /tmp/lego.tgz lego
chown root:root /opt/lego/bin/lego
chmod 755 /opt/lego/bin/lego
Get a public TLS certificate
Request a public certificate for your Raspberry PI hostname. In the following example, I’m using the DNS challenge method and the Gandi DNS provider. Of course, you would have also to replace raspberry-pi.example.test with your Raspberry PI’s hostname.
mkdir /etc/nginx/tls
GANDIV5_API_KEY=[REDACTED] /opt/lego/bin/lego -m replace.with@your.email -d raspberry-pi.example.test -a --dns gandiv5 --path /etc/nginx/tls run  --no-bundle
If everything went fine, you will find the freshly issued certificates in /etc/nginx/tls/certificates/$hostname.{key,crt}.
root@OpenWrt:~# find /etc/nginx/tls/
/etc/nginx/tls/
/etc/nginx/tls/certificates
/etc/nginx/tls/certificates/raspberry-pi.example.test.crt
/etc/nginx/tls/certificates/raspberry-pi.example.test.issuer.crt
/etc/nginx/tls/certificates/raspberry-pi.example.test.key
/etc/nginx/tls/certificates/raspberry-pi.example.test.json
Configure nginx
Create a user for the nginx workers.
opkg update
opkg install shadow-useradd
useradd -d /var/run/nginx -s /bin/false -m -r nginx
Create the nginx configuration file in /etc/nginx/nginx.conf.
user nginx nginx;
worker_processes 1;

error_log syslog:server=unix:/dev/log,nohostname warn;

events {
    worker_connections 1024;
}

http {
    server_names_hash_bucket_size 64;
    include mime.types;

    log_format main '$remote_addr "$request" => $status';
    access_log syslog:server=unix:/dev/log,nohostname main;

    sendfile on;
    keepalive_timeout 65;
    gzip off;

    server {
        listen 443 ssl default_server;

        ssl_certificate /etc/nginx/tls/certificates/raspberry-pi.example.test.crt;
        ssl_certificate_key /etc/nginx/tls/certificates/raspberry-pi.example.test.key;
        ssl_session_cache shared:SSL:1m;
        ssl_session_timeout 5m;
        ssl_ciphers HIGH:!aNULL:!MD5;
        ssl_prefer_server_ciphers on;

        # Error pages
        error_page 404 /404.html;
        error_page 500 502 503 504 /50x.html;
        location ~ /[45][0-9x][0-9x].html {
            root /srv/nginx/default;
        }

        # Main content
        index index.html index.htm;
        location / {
            root /srv/nginx/default;
        }
    }
}
Create the default page and the error pages.
mkdir -p /srv/nginx/default
echo "None of your business." > /srv/nginx/default/index.html
echo "Nope. Not here." > /srv/nginx/default/404.html
echo "OOPS..." > /srv/nginx/default/50x.html
Start nginx
Start the nginx instance.
service nginx enable
service nginx start
If your configuration is valid, the port 443 should be bound to nginx.
root@OpenWrt:~# netstat -tlnp |grep :443
tcp        0      0 0.0.0.0:443             0.0.0.0:*               LISTEN      11305/nginx.conf -g
If nginx does not start, you can get some details using the logread command.
logread |tail -n 10
If you cannot get any details using logread, try to start nginx manually.
nginx -g "daemon off;" -c /etc/nginx/nginx.conf
From your workstation, try to query your nginx instance by its IP address.
$ curl -k https://192.168.2.2/
None of your business.
Further configuration
So far, our nginx instance is only serving a few static files with unpleasant messages. This is the default virtual host of our nginx instance that is used when bots try to scan your web server by its IP address without knowing its actual hostname.
To add another virtual host, just add a new server block after the default one.
server {
    listen 443 ssl;
    server_name raspberry-pi.example.test

    ssl_certificate /etc/nginx/tls/certificates/raspberry-pi.example.test.crt;
    ssl_certificate_key /etc/nginx/tls/certificates/raspberry-pi.example.test.key;
    ssl_session_cache shared:SSL:1m;
    ssl_session_timeout 5m;
    ssl_ciphers HIGH:!aNULL:!MD5;
    ssl_prefer_server_ciphers on;

    # Error pages
    error_page 404 /404.html;
    error_page 500 502 503 504 /50x.html;
    location ~ /[45][0-9x][0-9x].html {
        root /srv/nginx/default;
    }

    # Main content
    index index.html index.htm;
    location / {
        root /srv/nginx/main;
    }
}
Serve some nice content.
mkdir -p /srv/nginx/main
echo 'Welcome!' > /srv/nginx/main/index.html
From your workstation, try to query your nginx instance by its hostname.
$ curl https://raspberry-pi.itix.fr/
Welcome!
Certificate renewal
The TLS certificate we fetched from Let’s Encrypt is valid for ninety days. If you do not want to manually renew the certificate every ninety days, you will have to setup automatic renewal in a cron job.
Create a file /opt/lego/etc/lego.conf containing the environment variables needed by Lego to use your DNS provider. Example shown below with Gandi, which is my DNS provider.
export GANDIV5_API_KEY=[REDACTED]
Make it readable only by root.
chmod -R og-rwx /opt/lego/etc/
Create a file /opt/lego/bin/renew.sh with the following content. Do not forget to change the email address and the hostname!
#!/bin/sh

set -e # Exit immediately if a command exits with a non-zero status

. /opt/lego/etc/lego.conf

/opt/lego/bin/lego -m replace.with@your.email -d raspberry-pi.example.test -a --dns gandiv5 --path /etc/nginx/tls run  --no-bundle
/etc/init.d/nginx restart
Make it executable.
chmod 755 /opt/lego/bin/renew.sh
Edit the crontab of the root user.
crontab -e -u root
And an entry to renew the certificate using lego.
# At 3:59 the first day of the month, renew the Let's Encrypt certificates
59 3 1 * * /opt/lego/bin/renew.sh
Conclusion
Nginx is now installed on your Raspberry PI, with TLS support enabled and a valid public certificate from Let’s Encrypt that will be renewed automatically. The configuration serves a default virtual host to every bot that queries the nginx instance by its IP address and can serve any number of virtual host, provided you add the matching server block.
Discover in the next article how to deploy a real world application: miniflux, an RSS reader.