Deploy OpenShift Single Node in KVM
Starting with version 4.8, OpenShift can now officially be installed on a single virtual machine (instead of three). This effectively lowers the resources requirements and open up new possibilities for home labs or developer workstations. This article explores how to deploy OpenShift Single Node (SNO) using KVM on your Fedora workstation.
Pre-requisites
On your Fedora workstation, make sure you installed the required packages as explained in the Fedora documentation.
Configure NetworkManager to use dnsmasq for DNS resolution.
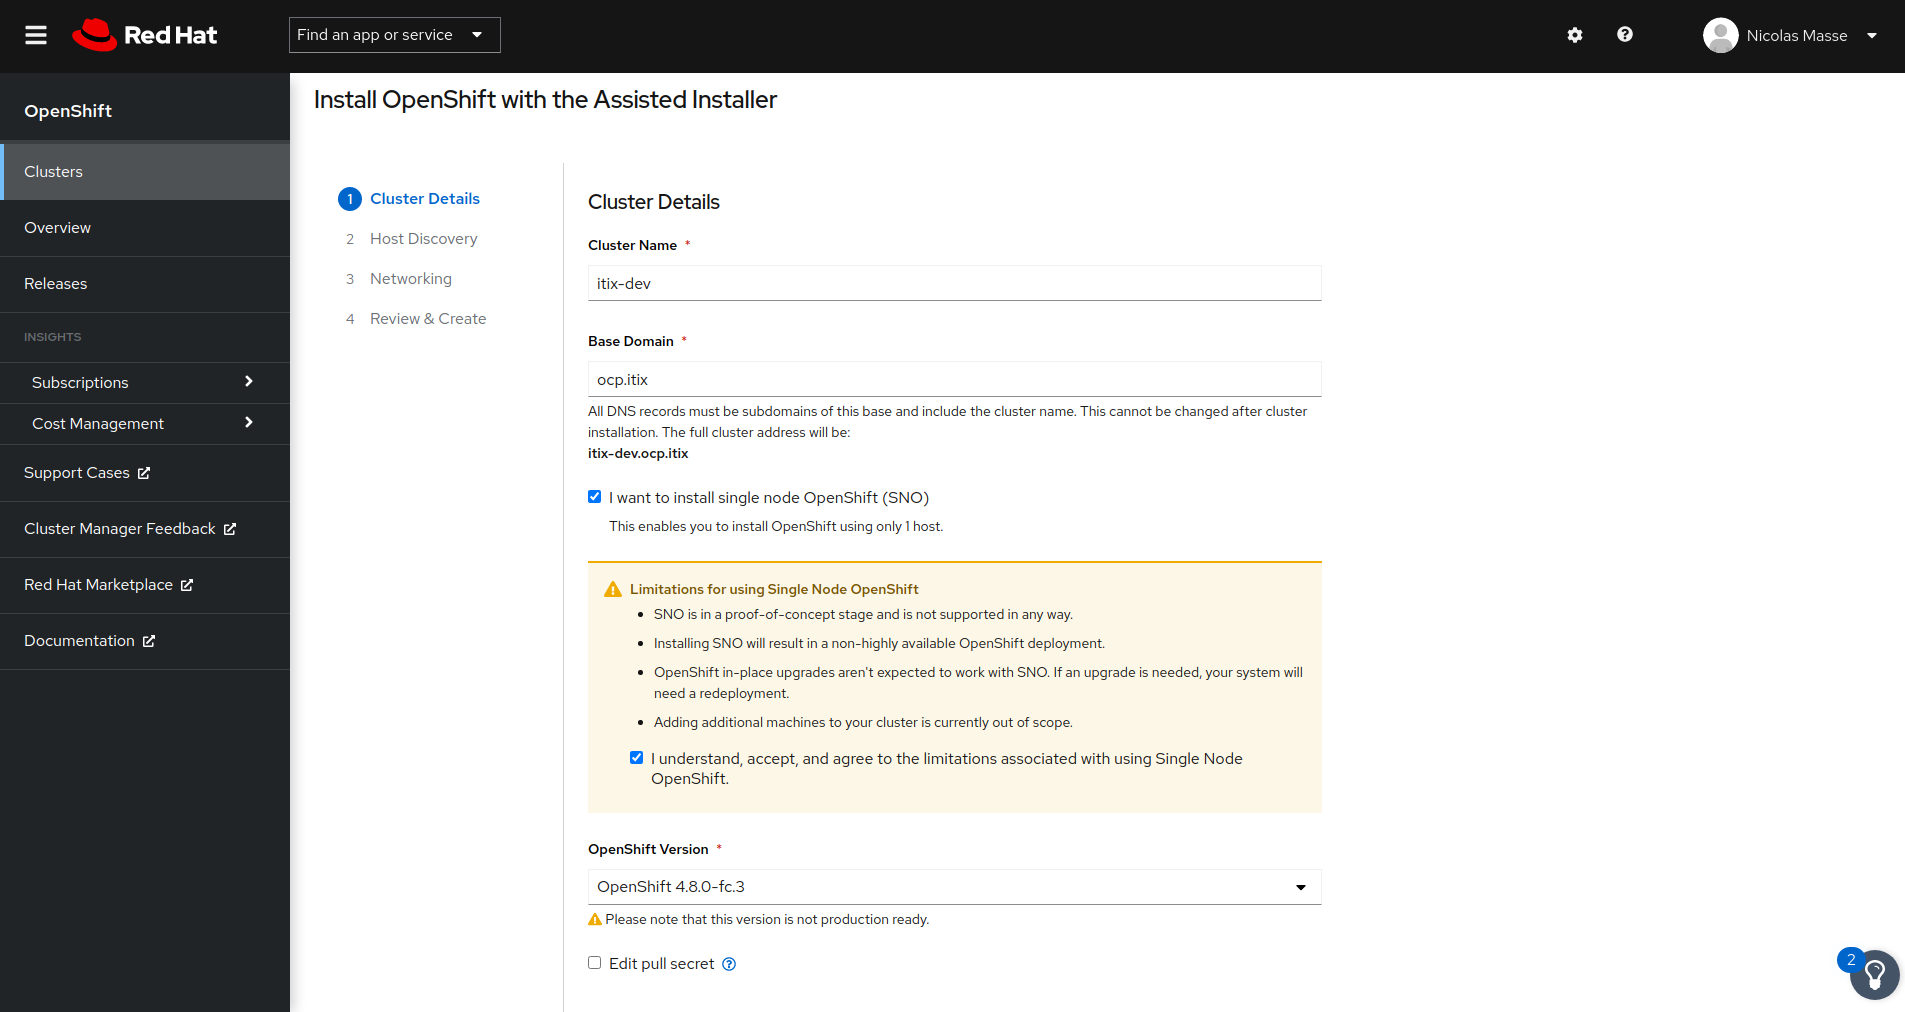
Choose a base domain name and a cluster name. The base domain does not need to be public or registered somewhere. It just has to be unique. In the rest of this article, I chose ocp.itix.
The cluster name can be anything you want. I chose itix-dev.
Combined together, those two pieces of information defines the DNS name of your cluster: <cluster_name>.<base_domain>.
The kubernetes API will be available at api.<cluster_name>.<base_domain>.
The OpenShift routes will be available at *.apps.<cluster_name>.<base_domain>.
Note: Do not choose a .local base domain as it is reserved for multicast DNS.
Last but not least, you will need a user account on cloud.redhat.com. You can get one for free by registering as a developer here.
Create the libvirt network
Create the libvirt network definition.
<network xmlns:dnsmasq="http://libvirt.org/schemas/network/dnsmasq/1.0">
  <name>ocp-dev</name>
  <forward mode='nat'>
    <nat>
      <port start='1024' end='65535'/>
    </nat>
  </forward>
  <bridge name='virbr1' stp='on' delay='0'/>
  <ip address='192.168.123.1' netmask='255.255.255.0'>
    <dhcp>
      <range start='192.168.123.2' end='192.168.123.254'/>
      <host mac="02:01:00:00:00:66" name="node.itix-dev.ocp.itix" ip="192.168.123.5"/>
    </dhcp>
  </ip>
  <dns>
    <host ip="192.168.123.5"><hostname>api.itix-dev.ocp.itix</hostname></host>
  </dns>
  <dnsmasq:options>
    <!-- fix for the 5s timeout on DNS -->
    <!-- see https://www.math.tamu.edu/~comech/tools/linux-slow-dns-lookup/ -->
    <dnsmasq:option value="auth-server=itix-dev.ocp.itix,"/><!-- yes, there is a trailing coma -->
    <dnsmasq:option value="auth-zone=itix-dev.ocp.itix"/>
    <!-- Wildcard route -->
    <dnsmasq:option value="host-record=lb.itix-dev.ocp.itix,192.168.123.5"/>
    <dnsmasq:option value="cname=*.apps.itix-dev.ocp.itix,lb.itix-dev.ocp.itix"/>
  </dnsmasq:options>
</network>
This file defines a libvirt network named ocp-dev and add the required DNS records for a standard installation of OpenShift. Make sure to replace itix-dev.ocp.itix by your cluster name and base domain.
There is a DHCP reservation for the MAC address of the OpenShift virtual machine. This MAC address is used below during the installation.
Create the libvirt network, start it and flag it as autostart.
sudo virsh net-define ocp-net.xml
sudo virsh net-start ocp-dev
sudo virsh net-autostart ocp-dev
Create the cluster on cloud.redhat.com
To install OpenShift Single Node, we will use a new technology called “Assisted Installer”. Once you declared your cluster on cloud.redhat.com, an ISO image is generated. This ISO image is used to boot the machine that will host your OpenShift. The ISO image contains a program that will register the machine on cloud.redhat.com and once you validate the installation, the machine pulls its installation instructions from cloud.redhat.com and start installing OpenShift.
Create a cluster with the Assisted Installer.
- Click Clusters > Create cluster
- Choose Datacenter and click Create cluster (just under Assisted installer)
Configure the cluster.
- Fill-in the Cluster Name, Base Domain
- Check I want to install single node OpenShift (SNO)
- Click Next
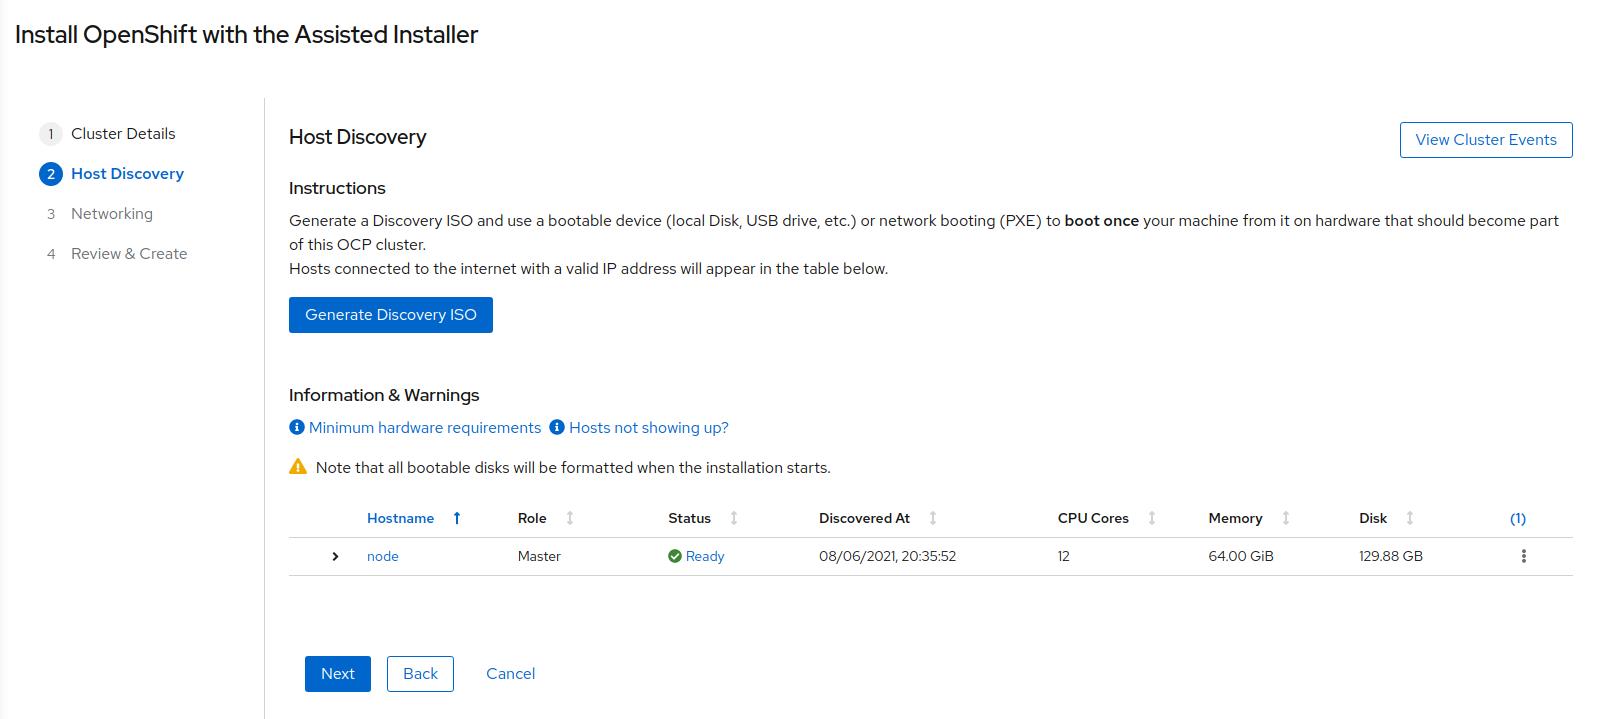
Generate the ISO image.
- Click Generate Discovery ISO
- Copy/paste your SSH public key. You will use it to complete the installation.
- Once the ISO has been generated, copy the Discovery ISO URL
Download the ISO image under /var/lib/libvirt/images.
sudo curl -Lo /var/lib/libvirt/images/discovery_image.iso 'https://s3.us-east-1.amazonaws.com/assisted-installer/discovery-image-....'
Boot a Virtual Machine on the downloaded ISO image. Make sure to adjust the CPUs, memory and disk size but leave the MAC address as-is since it must match the DHCP host record declared in the libvirt network.
sudo virt-install -n ocp-dev --memory 65536 --vcpus=12 --os-variant=fedora-coreos-stable --accelerate -v --cpu host-passthrough,cache.mode=passthrough --disk path=/var/lib/libvirt/images/ocp-dev.qcow2,size=120 --network network=ocp-dev,mac=02:01:00:00:00:66 --cdrom /var/lib/libvirt/images/discovery_image.iso
On cloud.redhat.com, wait for the node to appear in the list.
- Click Next.
- Select your Network Subnet in the dropdown list.
- Click Next.
- Click Install Cluster.
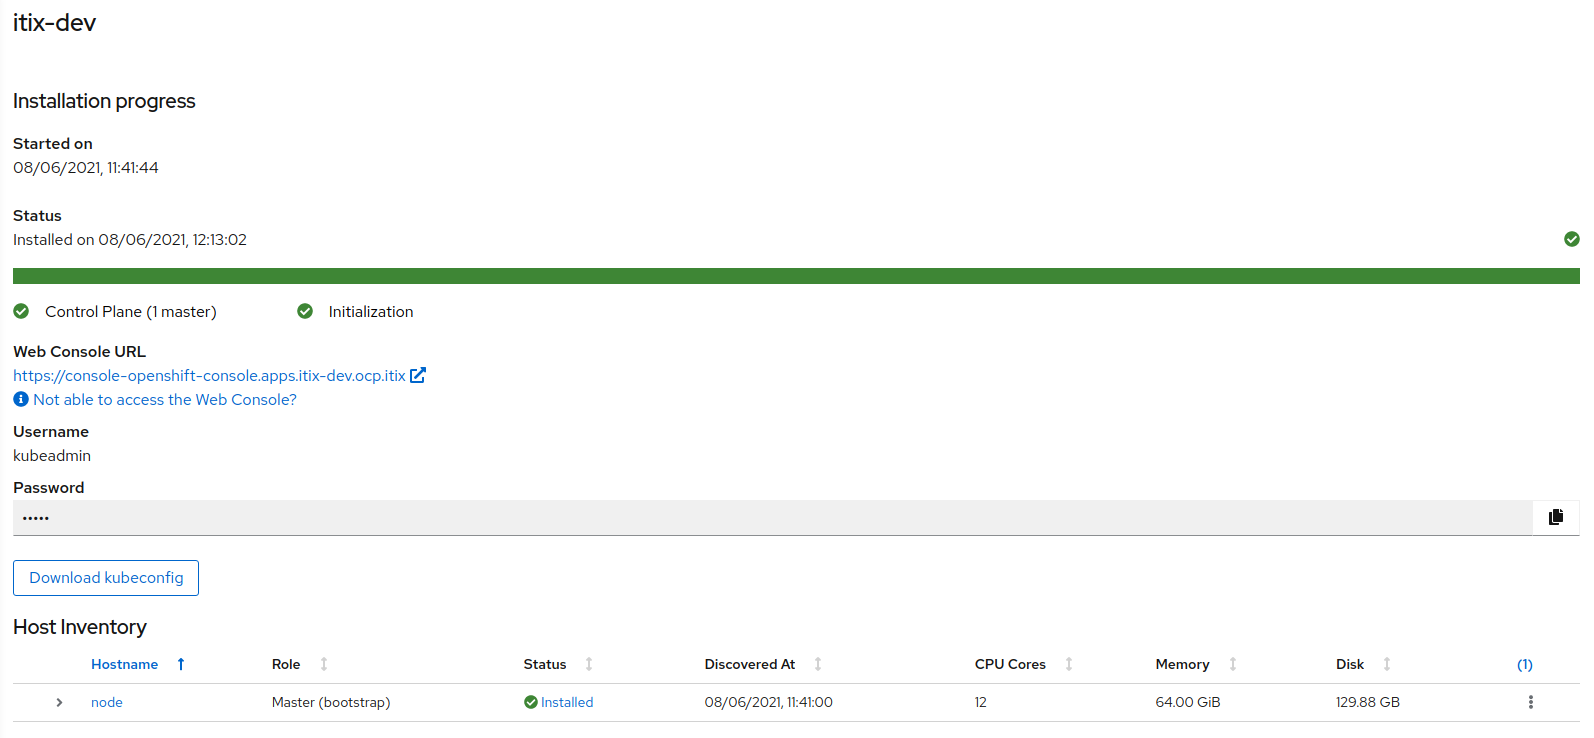
You can follow the installation process from cloud.redhat.com. Once the installation is complete, download the kubeadmin password and make sure you can access the OpenShift Console.
Also, make sure you can login with SSH to your OpenShift node. If you configured NetworkManager and dnsmasq as explained here , you should be able to reach your OpenShift node by its DNS name. Otherwise, use the IP address.
ssh core@node.itix-dev.ocp.itix
Configure storage
By default, OpenShift does not provision any storage for your containers. To be able to use persistent storage, we need to create Persistent Volumes and a Storage Class.
Create some storage under /srv/openshift for your containers.
ssh core@node.itix-dev.ocp.itix "sudo /bin/bash -c 'mkdir -p /srv/openshift/pv-{0..99} ; chmod -R 777 /srv/openshift ; chcon -R -t svirt_sandbox_file_t /srv/openshift'"
Create the matching Persistent Volumes.
for i in {0..99}; do
  oc create -f - <<EOF
apiVersion: v1
kind: PersistentVolume
metadata:
  name: pv-$i
  labels:
    type: local
spec:
  storageClassName: manual
  capacity:
    storage: 10Gi
  accessModes:
  - ReadWriteOnce
  - ReadWriteMany
  persistentVolumeReclaimPolicy: Recycle
  hostPath:
    path: "/srv/openshift/pv-$i"
EOF
done
Create the Storage Class.
oc create -f - <<EOF
kind: StorageClass
apiVersion: storage.k8s.io/v1
metadata:
  name: manual
  annotations:
    storageclass.kubernetes.io/is-default-class: 'true'
provisioner: kubernetes.io/no-provisioner
reclaimPolicy: Delete
volumeBindingMode: WaitForFirstConsumer
EOF
Configure the internal registry
Just after installation, the OpenShift internal registry is waiting for storage to become available. Now that we provisioned some storage, let’s configure the registry accordingly.
Create a Persistent Volume Claim for the registry.
oc create -f - <<EOF
apiVersion: v1
kind: PersistentVolumeClaim
metadata:
  name: registry-storage
  namespace: openshift-image-registry
spec:
  accessModes:
  - ReadWriteMany
  resources:
    requests:
      storage: 10Gi
EOF
Change the configuration of the Registry Operator to use the new PVC.
oc patch configs.imageregistry.operator.openshift.io cluster --type=json --patch-file=/dev/fd/0 <<EOF
[{"op": "remove", "path": "/spec/storage" },{"op": "add", "path": "/spec/storage", "value": {"pvc":{"claim": "registry-storage"}}}]
EOF
oc patch configs.imageregistry.operator.openshift.io cluster --type merge --patch-file=/dev/fd/0 <<EOF
{"spec":{"managementState": "Managed"}}
EOF
Congratulation! You now have an OpenShift Single Node that is fully functional.
Last modified on August 25, 2022