Consistent DNS name resolution for virtual machines and containers
When developing on microservices, developers need to run a mix of software. Some of them running in containers, others in virtual machines, some others in the cloud and the rest on the developer’s workstation.
Microservices having a lot of connections between themselves in addition to technologies such as TLS or OpenID Connect implies DNS names to be consistent.
Consistent DNS names means that no matter if a client on the developer workstation, on a VM or on a container, trying to reach a server on the developer workstation, on a VM or on a container, the server DNS name must always be the same.
This article explains how to setup a developer workstation on Fedora, with Libvirt VMs and Podman containers and achieve consistent DNS name resolution.
Context
Microservices have a lot more connections between themselves than a monolithic application. In a classical three tier architecture, the presentation tier talks to the application tier that in turns talks to the data tier. With microservices, one can talk to several other services and those services can in turn call other services or even call back the originating microservice.
Now, add in the mix two technologies: TLS and OpenID Connect.
OpenID Connect is used to authenticate users and implies three components:
- the Authorization Server (usually running in VM or container)
- the Resource Server (usually running on the developer’s workstation or in a VM or container)
- the developer’s browser
And because there is a set of HTTP redirections and server-to-server connections at play in the OpenID Connect protocol, you need to have consistent DNS names between the host, the VMs and the containers.
TLS is used to secure connections between microservices and can optionally authenticate the calling microservice (mutual TLS).
Because the TLS protocol mandates the server name to be explicitly listed in the server certificate, it is easier when you have consistent DNS names. Disabling TLS server certificate validation to get around inconsistent naming implies a different procedure for each programming language, which is far from practical.
One dnsmasq to rule them all!
On fedora, virtual machines created with libvirt and containers created with Podman have their DNS served by separate dnsmasq instances. By default, the host (the developer’s workstation) is not configured to query those dnsmasq instance. Hence, if you try to query your container by its DNS name from your host, it will fail.
By configuring a third dnsmasq instance to gather the libvirt and podman ones, we achieve consistent DNS name resolution. The beauty of this setup is that you do not have to maintain this third dnsmasq instance since there is one provided with NetworkManager, and we will re-use it!

Configure Podman
By default, Podman does not assign DNS names to containers. You can change this by editing the default podman network named podman.
Edit /etc/cni/net.d/87-podman-bridge.conflist and add the dnsname plugin in the plugins array. The complete file should look like this:
{
  "cniVersion": "0.4.0",
  "name": "podman",
  "plugins": [
    {
      "type": "bridge",
      "bridge": "cni-podman0",
      "isGateway": true,
      "ipMasq": true,
      "hairpinMode": true,
      "ipam": {
        "type": "host-local",
        "routes": [{ "dst": "0.0.0.0/0" }],
        "ranges": [
          [
            {
              "subnet": "10.88.0.0/16",
              "gateway": "10.88.0.1"
            }
          ]
        ]
      }
    },
    {
      "type": "portmap",
      "capabilities": {
        "portMappings": true
      }
    },
    {
      "type": "firewall"
    },
    {
      "type": "tuning"
    },
    {
        "type": "dnsname",
        "domainName": "dns.podman",
        "capabilities": {
            "aliases": true
        }
    }
  ]
}
Configure Libvirt
The default libvirt network configuration is pretty good since DNS is enabled by default. In this section, I’m proposing to slightly adjust it to explicitly define the DNS zone (dns.libvirt). This also prevents the infamous 5 seconds timeout on IPv6 DNS queries.
Create a file /tmp/default-net.xml that contains the following libvirt network definition.
<network xmlns:dnsmasq="http://libvirt.org/schemas/network/dnsmasq/1.0">
  <name>default</name>
  <forward mode='nat'>
    <nat>
      <port start='1024' end='65535'/>
    </nat>
  </forward>
  <bridge name='virbr0' stp='on' delay='0'/>
  <ip address='192.168.122.1' netmask='255.255.255.0'>
    <dhcp>
      <range start='192.168.122.2' end='192.168.122.254'/>
    </dhcp>
  </ip>
  <dnsmasq:options>
    <dnsmasq:option value="auth-server=dns.libvirt,"/><!-- yes, there is a trailing coma -->
    <dnsmasq:option value="auth-zone=dns.libvirt"/>
  </dnsmasq:options>
</network>
Replace the default libvirt network.
sudo virsh net-undefine default
sudo virsh net-define /tmp/default-net.xml
sudo virsh net-start default
sudo virsh net-autostart default
Configure NetworkManager
Fedora uses by default systemd-resolved for DNS name resolution. In this section, we will configure NetworkManager to replace systemd-resolved with dnsmasq. We will also configure the dnsmasq instance bundled with NetworkManager.
Edit /etc/NetworkManager/NetworkManager.conf and set the dns directive in the main section.
[main]
dns=dnsmasq
Delete the /etc/resolv.conf symbolic link created by systemd-resolved and replace it by an empty file.
sudo rm /etc/resolv.conf
sudo touch /etc/resolv.conf
Restart NetworkManager.
sudo systemctl restart NetworkManager
At this point, your /etc/resolv.conf should contain the following content:
# Generated by NetworkManager
search itix.fr
nameserver 127.0.0.1
options edns0 trust-ad
Create the dnsmasq configuration file to dispatch requests to dns.podman, dns.libvirt and dns.host.
server=/dns.podman/10.88.0.1
server=/dns.libvirt/192.168.122.1
host-record=host.dns.host,192.168.122.1
Restart the dnsmasq instance of NetworkManager.
sudo pkill -f '[d]nsmasq.*--enable-dbus=org.freedesktop.NetworkManager.dnsmasq'
End-to-end test
Now that everything is configured, we will install a container, a VM and make sure we can resolve the IP address of all of them from all of them.
Start a fedora container.
sudo podman run -it --name fedora --rm registry.fedoraproject.org/fedora:latest
Install Fedora in a virtual machine.
sudo curl -Lo /var/lib/libvirt/images/fedora-cloud.qcow2 https://download.fedoraproject.org/pub/fedora/linux/releases/34/Cloud/x86_64/images/Fedora-Cloud-Base-34-1.2.x86_64.qcow2
sudo virt-install --name fedora --memory 3074 --cpu host --vcpus 2 --graphics none --os-type linux --os-variant fedora33 --import --disk path=/var/lib/libvirt/images/fedora-cloud.qcow2,format=qcow2,bus=virtio --network network=default --cloud-init
Write down the root password that is auto-generated for you and login as root once the VM has started.
If at any time you need to close the VM console, use Ctrl+AltGr+].
Set the hostname of the Fedora virtual machine and renew its DHCP lease.
hostnamectl set-hostname fedora.dns.libvirt
ifdown eth0
ifup eth0
Install dig on your workstation, in the virtual machine and in the container.
dnf install -y bind-utils
From your host, the container and the virtual machine, run those commands and make sure they all return the correct IP address.
dig +short host.dns.host
dig +short fedora.dns.podman
dig +short fedora.dns.libvirt
dig +short www.google.fr
If your configuration is correct, you should get the following result. The top left terminal is the container, the bottom left terminal is the virtual machine and the right terminal is the host.
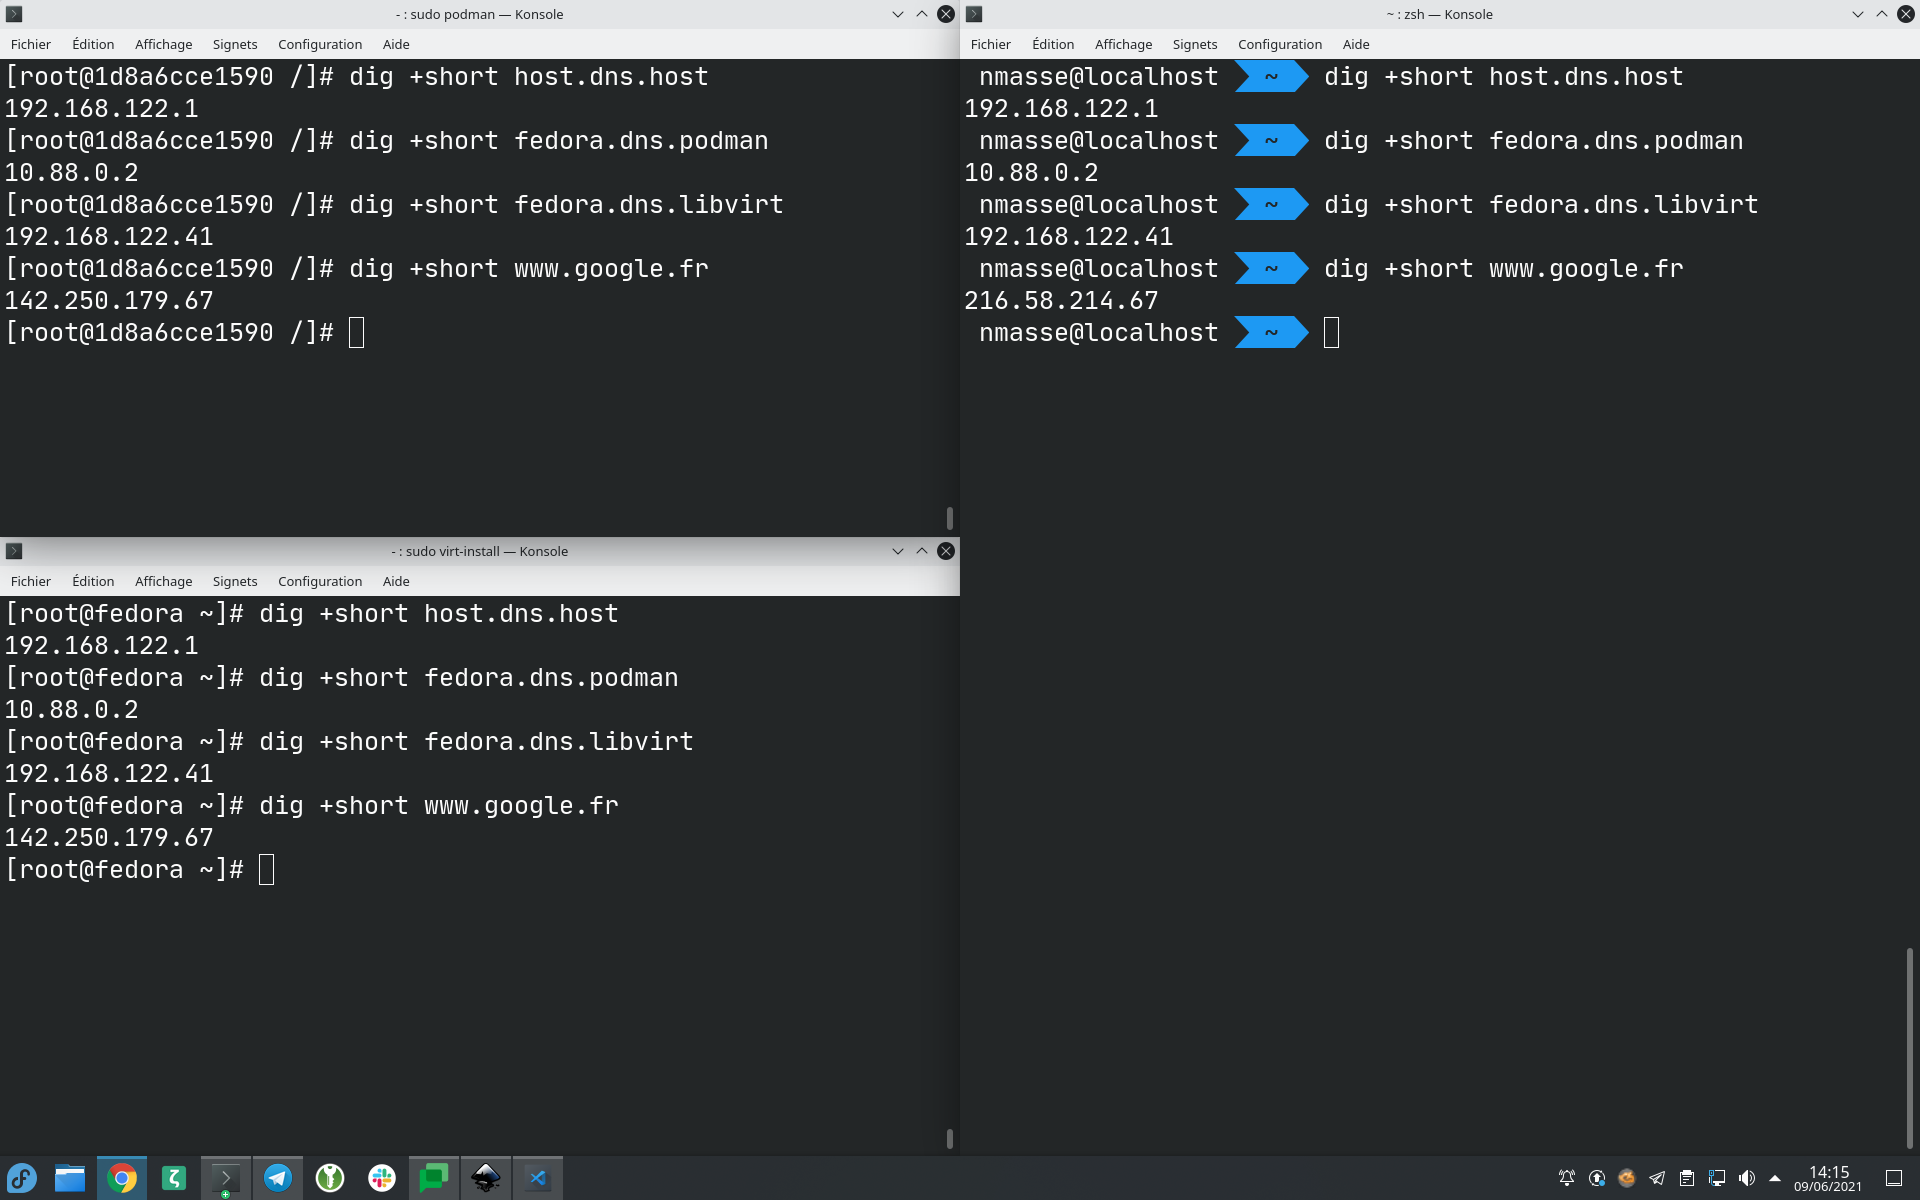
Congratulations! You just configured a consistent DNS name resolution between VMs, containers and the host.
Last modified on June 10, 2021